Preparing Libraries:
CMake:
Since most of the libraries provide cmake files to generate files, it is better to have a CMake on your Mac. I do not know a lot about CMake. I just explain how to install it.
For convenience, I installed CMake by Homebrew. Here is the link for installing Homebrew:http://brew.sh
After installing Homebrew, just type “brew install cmake” command in Terminal and CMake will be installed.
GLFW:
1. Go to website and download the file: http://www.glfw.org
2. Unzip the downloaded file.
3. Open Terminal and go to the root directory of glfw, like “glfw-3.2”.
4. Type commands:
cmake .
make
sudo make install
It means GLFW is successfully installed.
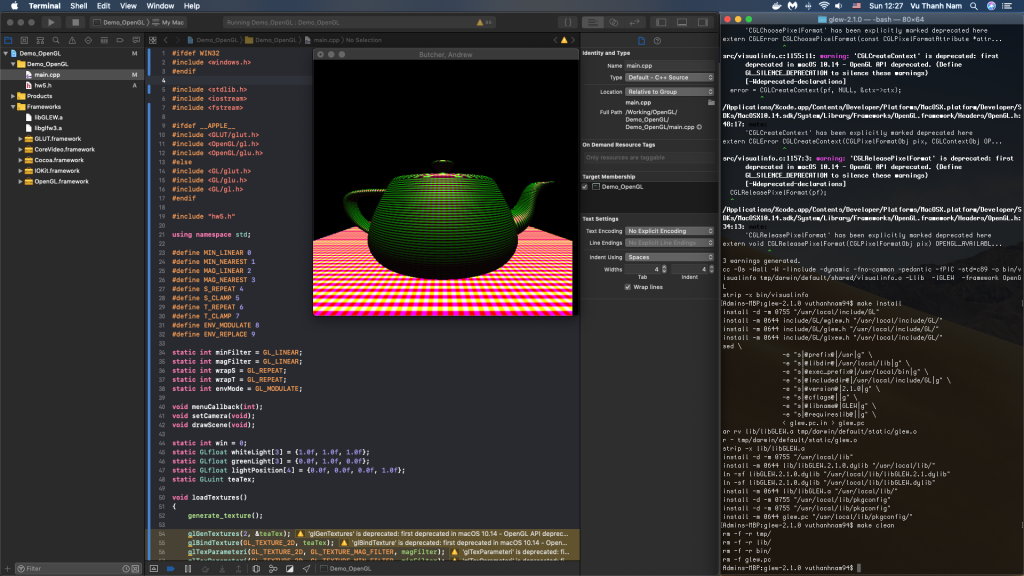
GLEW:
1. Go to website and download the file:http://glew.sourceforge.net
2. Open Terminal and go to the root directory of glew, like “glfw-3.1.2”.
3. Type commands:
make
make install
make clean
You may have problem like “no permission”. Because users do not have the permission to directly modify the folder /usr/local/include and /usr/local/lib. You may use command in Terminal to get the permission if you like to install in these folders. Otherwise you can modify the Makefile so that it will generate into different folder. The commands to get the permission are
sudo chown -R $(whoami) /usr/local/include/GL
sudo chown -R $(whoami) /usr/local/lib
What’s more, you can also install glew by Homebrew.
Build in Xcode
1. Create a new Xcode project
2. Choose OSX->Application->Command Line Tool. Then give a name and path for this project.
3. Add framework.
a. click project name -> Build Phases -> link binary with libraries
b. Add these framework by click “+”:
OpenGL.framework
IOKit.framework
CoreVideo.framework
Cocoa.framework
c. Add extra library. Click “Add Other…”, use shortcuts “command+shift+G”, and input path “/usr/local/lib”
(If you do not change the path while installing, you will find all required library here). Add this library in:
libglfw3.a
libGLEW.a
4. Add header and library path.
a. Go to “Build Settings”.
b. Find “Header Search Path”. Input “/usr/local/include” (or the other folder contains the header)
c. Find “Library Search Path”. Input “/usr/local/lib” (or the other folder contains the header)
Since GLFW is supported by these framework on Mac, we need to include four frameworks in Step 3. However, from GLFW website:
If you are using the dynamic library version of GLFW, simply add it to the project dependencies.
If you are using the static library version of GLFW, add it and the Cocoa, OpenGL, IOKit and CoreVideo frameworks to the project as dependencies. They can all be found in /System/Library/Frameworks.
Other Libraries
GLM:
1. Go to website and download: http://glm.g-truc.net/0.9.7/index.html
2. Unzip downloaded file.
3. Go to “Build Settings” in project on Xcode. Find “Header Search Path”. Input “/<root directory of glm>”
GLM just needs to be included in the project. You can also copy “/<root directory of glm>/glm” folder to other place and include that path in the project. I just copy it into my “/usr/local/include”. It is convenient for me to organize it.
SOIL:
SOIL is a library to import pictures. It supports several types of pictures. Since the latest version is 07-07-2008, to make it work, I took much time to build it up.
1. Go to the website and download the “old” latest version http://www.lonesock.net/soil.html.
2. Unzip downloaded file.
3. Go to the root directory of SOIL.
4. Edit Makefile.
a. Add “-m64” after CFLAGS. Then this line become “CFLAGS += -c -O2 -Wall -m64”
(Resource: http://stackoverflow.com/a/35862048)
b. Modify “INCLUDEDIR” to the folder that you want to put in the header. For example, mine is “/usr/local/include/SOIL”.
c. Modify “LIBDIR” to the folder that you want to put in the library. For example, mine is “/usr/local/lib”.
d. Use Terminal to the root directory of SOIL. Type command
make
make install
make clean
e. Go to Build Phases -> link binary with libraries in project. Add other -> find “libSOIL.a”.